
A riflescope is basically used to zoom into a target while hunting or range shooting. To operate is properly, you should know how to adjust a rifle scope.
Exterior & Interior of Rifle Scopes
It has lenses and pieces of glasses that allows magnification. Depending on what type of scope you have, the magnification can be fixed or it can be changeable. The reticle is present inside the scope’s tube on one of the glass pieces. The reticle is also a crosshair symbol and is commonly called a crosshair. It allows you to zero in on the target. So, the crosshairs are actually fixed in the center of the target. In this very position, the shot you fire hits the target where the crosshairs are present.
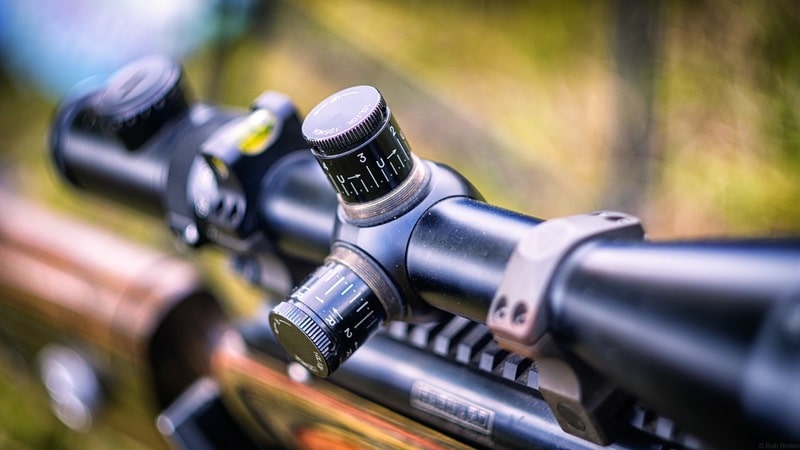
The exterior part of the scope has two knobs, they’re also called turrets. These turrets allow you to focus the reticle up, down or sideways to make it in line with the target. The knob present in the upper side is called ‘elevation’ i.e, the up-down adjustment knob. The side of the scope has what is known as a ‘windage’ or the left and right knob. When you adjust these knobs when you aim, you can move the scope and hence the rifle can aim even more precisely and shot at the target is accurate.
Here, we’ll show you the methods to adjust a rifle scope. But before jumping into all that let us first see what adjusting a rifle scope actually means.
What Does Adjusting A Rifle Scope Mean?
Adjusting a rifle scope can mean 3 things. What we mean is, there are three types of rifle scope adjustments. Any rifle scope can be adjusted for elevation, windage, and parallax. Let us see what they mean individually.
Windage
Windage is defined by MOA (Minute of Angles) and expressed in inches. It is usually adjusted by turning the scope turret, the more you turn the more windage you get. Your rifle scope will tell you the process of adjusting windage i.e, which turn does what.
Elevation
The elevation turret works on the same MOA principle and the mechanism to adjust elevation is same as the elevation turret. The difference is that the adjustment is done by moving the turret up and down.
Parallax
A lot of scope manufacturers used to set the parallax at the factory to keep us from messing with it. With high-end tactical scopes being so popular these days, parallel adjustment features have become a norm in the shooting market.
So, adjusting a windage, elevation, and parallax is basically adjusting the riflescope but wait there’s more. Windage, Elevation, and Parallax come after you’ve set up your riflescope. Setting it up is a whole another ball game but since adjusting begins at this stage, we’ll also look into it. But before that, let us see the importance and necessity of adjusting your scope.
Why Is Scope Adjusting Necessary?
At a certain magnification, the image will converge ahead of the scope reticle because of the scope lens, this will make the crosshair to appear on target when it is not. This is an out of focus condition and this can really be disadvantageous for you. This is called parallax. So, focusing is necessary and focusing is achieved when you’re constantly adjusting the scope, trying out different dial combinations and practicing at a shooting range, this helps you judge the situation properly.
Parallax
The scope is focused when you see the reticle not moving around the target with your eyes movement. A cheaper scope generally suffers parallax even at lower magnification. Focusing will certainly remove the parallax.
Elevation
The elevation is also equally important. You need your rifle to be on the same plane as your target, or at a plane that makes it easier to put your target on the scope and this can e achieved by controlling the elevation. You wouldn’t want to shoot straight if your target is up and vice versa.
Windage
The final thing is windage. Windage, in terms of science, is a force that an object creates because of the friction when there is a relative movement between the air and the object. When you lose windage, you lose efficiency. Hence, for a bullet to properly fly it should’ve windage and windage should be adjusted because of this very reason.
[amazon box=”B006PH5T3A”]
How To Adjust A Rifle Scope?
While we’ve already discussed the kinds of adjustment, now we’ll see the complete setup of a rifle scope and how to get all the parts together. This is a half adjustment half setup kind of tutorial.
We’ve divided the tutorial into 3 parts, with the first two focusing on the installation whereas the last one focuses on the core adjustment. Let’s get started now.
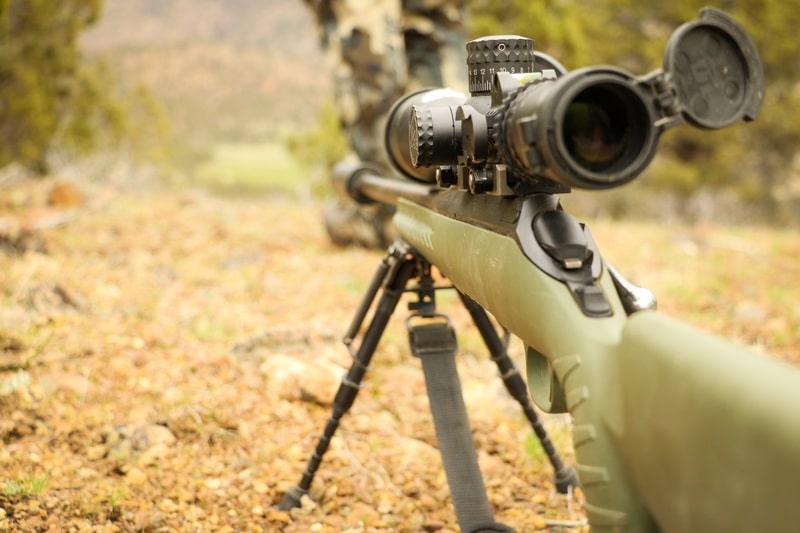
Installing the scope
The first thing to do is actually set the scope on the rifle. In this section, we’ll see how it is done.
- The first step is to mount the base and the ring s on the scope. Get a base mount and mounting rings which are sturdy enough. You can invest a good amount of money on the mount itself for your scope to be in proper place. The installation process is quite simple. Just tighten the screws into the mounts as shown in your scope’s manual. Proceed in an X pattern. Screw loosely at first and adjust it accordingly.
- The next thing you’d want to do is to mount the scope on the rifle. To do this, lay the scope into the bracket with the eyepiece. Make sure the eyepiece is set in the correct direction. First, use a small torpedo level and tighten the rings firmly.
- Put the eyepiece in the correct position. You can hit and trial this step. Look through the scope and adjust it till the image you see is sharp and clear. When the image is viewable, you are in the right way.
- Now, level the cross-hair. Your rifle must be held steadily and it should be mounted on a stand so that the rifle stock is level and square to the ground level. Rotate the cross-hair so that the verticle cross-hair is at the top. It should be centered. Now make sure the cross-hair is on correct position before you tighten it.
- The final step is to make sure that the mounting base is tightened. See if the cross-hair remains top centered. After that, slowly tighten your rings.
Setting Up your Zero
Once you’re done installing, the next step is to find your groove as they say. It means you need to zero in on the target. This is how you do it:
- To accurately sight-in a riflescope, you need to shoot it from various positions. The easiest way to do this is at a gun range or shooting practice. Also, practice gun safety while handling a rifle and be sure to take all precautions before heading out to a shooting range. You can use bulls-eye target for zeroing. You can then measure and make adjustments on the rifle.
- One important thing to remember while you’re zeroing a rifle is that you must eliminate user error from the equation as much as you can. To get a more accurate zero, you need to mount your gun into a rest. This is why you need to head to a shooting range. If you don’t have a steady gun rest then you can probably use something like a stack of books for a resting place. But, our advice is that you get a gun rest.
- In the shooting range, load the gun and take some shots with the safety on. Try hitting the bulls-eye. Now shoot with the safety off and see how it goes. Rinse and Repeat until you get the accurate shooting.
Done with the trial shootout? Then what…
- The next thing you’d want to do now is to examine your shot grouping. That is, check the target. Examine if you’ve hit the target
- Return to your rifle now and make adjustments using the knobs present on the top and side of your scope. Each Scope will have a slightly different mechanism of adjustment. Once you’re done with the adjustments, repeat the process. FIre a few rounds, check the groupings and adjust again. You can use a new target and compare, to see the targets you’ve already hit. Some targets have multiple bullseyes, you can shoot on these type of targets.
- The final thing you’d want to do is setting zero from multiple distances. Most marksmen generally want to sight-in the rifle from a variety of different positions. You can follow the same adjustment process at each position. You can always measure from at least two or even three or four distances. Start at 20 yards, then move out to about 75 yards. Make more adjustments and go up to 100 or even 200 yards if you’ve got the time.
Doing the actual Adjustments
The final adjustments are performed in the following ways:
- See what kind of knob you have. Most scopes have two dials, one on the top and one on the side which helps to adjust the scope and zero it. Doing this adjustment ensures what you’re seeing and the position of the rifle’s aim will be in line. The top knob is basically used to adjust the up and downs of he cross-hairs while the one on the side can help adjust the scope from left to right. Some older scopes also have a small key to turn the knobs for better precision. Although, you can easily achieve that with the help of a dial.
- While target practicing, move the sight of the scope towards the misses. Move it to the direction of the misses and make constant adjustments until you achieve a perfect sight where you can constantly hit the target.
- If you can’t still hit the target, then go for a very small adjustment. Read the user manual to see what inches per click will get you and then turn the dial accordingly.
- You can also use a laser sighter if you really want to achieve greater precision. If you don’t have a laser sighter, you can always take your rifle to a place where they manually place a laser bore sighter. After it has lasers have bee fitted, you can test it. There are a few adjustments there, reading the user manual will do the trick for you as different models have different features and adjustments.
Precautions and Tips for Adjusting a Rifle Scope
While Adjusting the parallax, keep the following things in mind:
- The reticle should be crisp and clear as you sight down the scope
- The parallax turret should be adjusted slightly while moving your head and eyes
- Adjust the parallax until there is no more movement in the reticle’s relation to the target.
While Adjusting the elevation, you should take the following hints:
- Make sure you have enough bullets as you may need to fire a lot of them before you get the settings right.
- Use the same bullet brand for consistent results.
- Don’t adjust elevation and windage at the same time
- Be patient.
- Allow the rifle to cool down between shots
- You should do 3 shots per click on the scope
As far as windage is concerned, it’s pretty straightforward. You twist the dial until you get the required settings. It is kind of self-explanatory.
Conclusion
In conclusion, knowing how to adjust a rifle scope is pretty important. It not only helps you with your shooting endeavors but it also makes you become a great shooter. If you know how to adjust the rifle scope, your aim becomes better. While you’re hunting, you wouldn’t want to miss a target just because your aim is too shabby. A target practice will also require you to fire appropriately as the shooting range is the place where you develop your skills.
If you have proper knowledge about the ins and outs of the rifle scopes if you can judge the windage, elevation, and parallax. In addition, being able to set up a rifle scope by yourself is an essential skill for a shooter. This shows your dedication to learn and better yourself. There are some precautions you should definitely take while you’re setting it up yourself. Finally, don’t be scared to shoot from distance and take risks on the shooting range.